General Project Settings
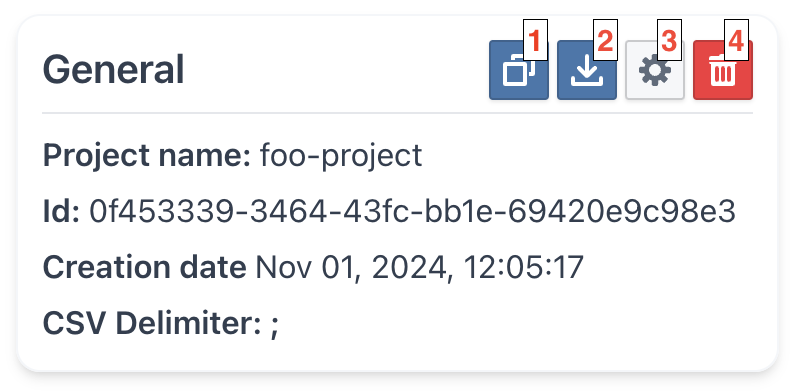
The General Project Settings tab provides an overview of your project, including general information, key metrics, and essential actions that can be performed on the project. This section allows you to manage and configure details such as project name, templates, and CSV delimiter, as well as perform actions like downloading or deleting the project.

Overview of Project Details
Upon accessing the General Project Settings, you'll see detailed project information:
- Project Name: The current name of your project, visible across the DATAMIMIC interface, and can be edited here.
- Project ID: A unique identifier assigned to the project upon creation.
- Creation Date: The date and time when the project was created.
- CSV Delimiter: Character used to separate values when downloading CSV files from the platform.
- Pipe (
|) - Default, recommended for data interchange - Semicolon (
;) - European CSV convention - Comma (
,) - Standard CSV format - Tab - Tab-separated values
- Project File Encoding: Character encoding for downloaded files.
- UTF-8 (default, recommended)
- UTF-8-BOM
- UTF-8-RFC
- UTF-16LE
- UTF-16BE
- UTF-32
- UTF-32LE
- UTF-32BE
- ANSI
- Windows-1251
- Windows-1258
- Windows-1250
- Windows-1252
- ISO-8859-1 (Latin-1)
- Log Level: Configure the logging level for project tasks.
Upload Any Format
You can upload CSV files with any encoding or delimiter. The platform automatically detects and converts them. Your configured settings only affect downloads.
General Actions

- Make as Template: Create a template for other users to use as a base for new projects.
- Download Project: Export the project as a
.tar.gzarchive to store locally or transfer to other DATAMIMIC instances. - Edit Project: Modify project settings, including project name, CSV delimiter, and encoding.
- Delete Project: Permanently remove the project from the system.
Danger
Deleting a project is irreversible and will result in the permanent removal of all project data from the system.
Update Project Configuration
To edit the project configuration, select the edit icon in the General Actions section. This opens the Update Project Config dialog, where you can modify:
- Project name
- CSV delimiter
- Project File Encoding (default encoding used when downloading project files)
- Log Level: Control the verbosity and detail of logging for your project tasks (default: INFO)
Available Project File Encoding:
- UTF-8 (default, recommended)
- UTF-8-BOM
- UTF-8-RFC
- UTF-16LE
- UTF-16BE
- UTF-32
- UTF-32LE
- UTF-32BE
- ANSI
- Windows-1251
- Windows-1258
- Windows-1250
- Windows-1252
- ISO-8859-1 (Latin-1)
Available log levels (in order of increasing severity):
- INFO: General operational information about task execution (default)
- DEBUG: Detailed information for debugging purposes
- WARNING: Warning messages for potentially harmful situations
- ERROR: Error messages for serious problems
- CRITICAL: Critical errors that may prevent the task from running
Tip
Use DEBUG level when troubleshooting issues, and WARNING or higher for production environments to reduce log noise.

Template Management
The Template Management feature allows administrators to create reusable project templates, providing a standardized setup that can streamline new project creation in DATAMIMIC.
Creating a Template
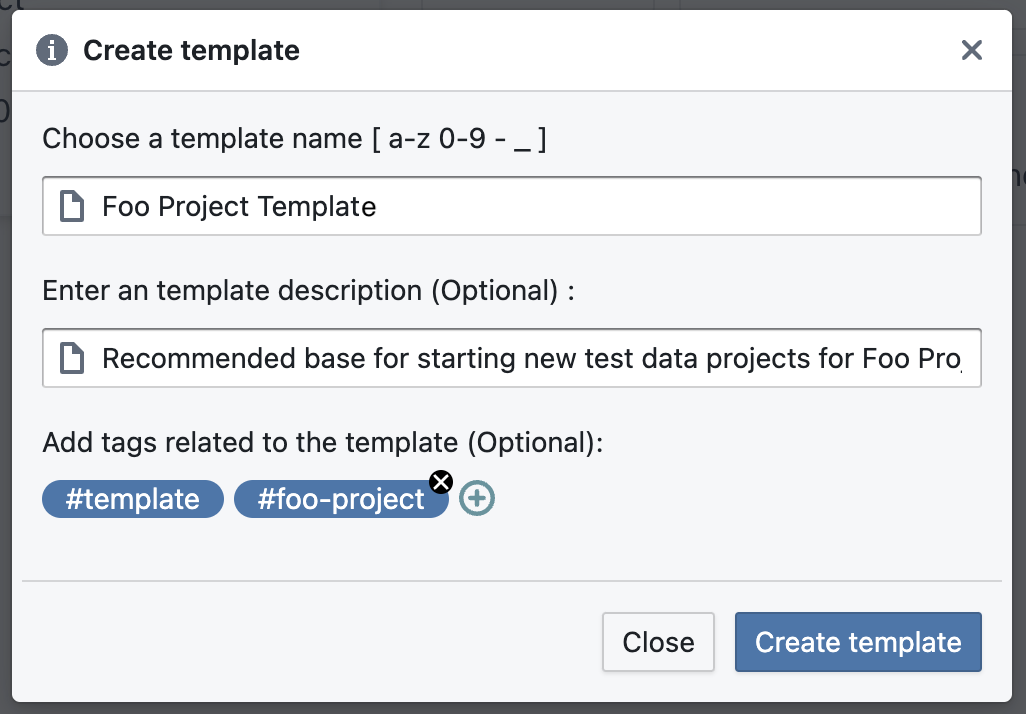
Admins can create templates to encapsulate project settings for future reuse. Here's how:
- Access the Template Panel: Go to the 'Settings' section of the project to be templated.
- Select 'Make as Template': This initiates a new template creation process. In the dialog, specify the template name, description, and tags.

Note
Only users with admin privileges can create templates. Regular users can share their projects with an admin to request template creation.
Managing Templates
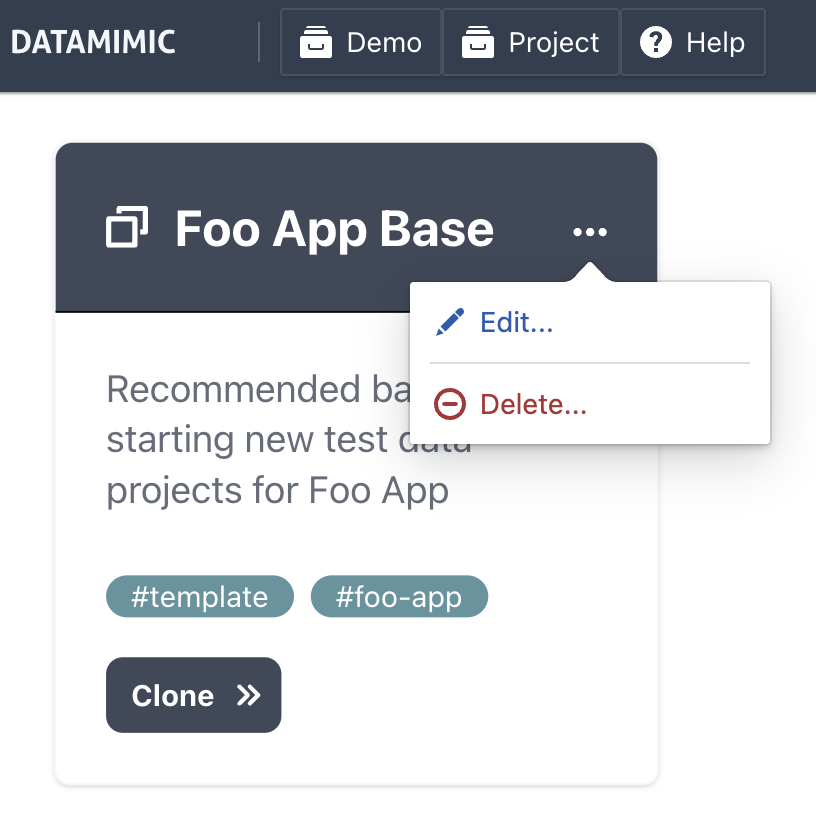
Once a template is created, it can be managed from the Template Store. Admins have the ability to update or delete templates as necessary.
- Update Template: Use the three-dot menu on the template tile and choose 'Edit' to make changes in the dialog.

- Delete Template: Select 'Delete' from the menu and confirm the deletion to remove the template permanently.
Danger
Deleting a template is irreversible. Once deleted, the template cannot be recovered.
Tip
Template Usage: Templates can be cloned by users with access, making it easy to create standardized projects.
Best Practices and Tips
- Consistent Naming Conventions: Use clear, consistent names when renaming projects for better organization.
- Utilize Templates: Save time by creating templates for recurring project setups.
- Double-Check Before Deletion: Deleting a project is permanent. Confirm that you no longer need the project before proceeding.